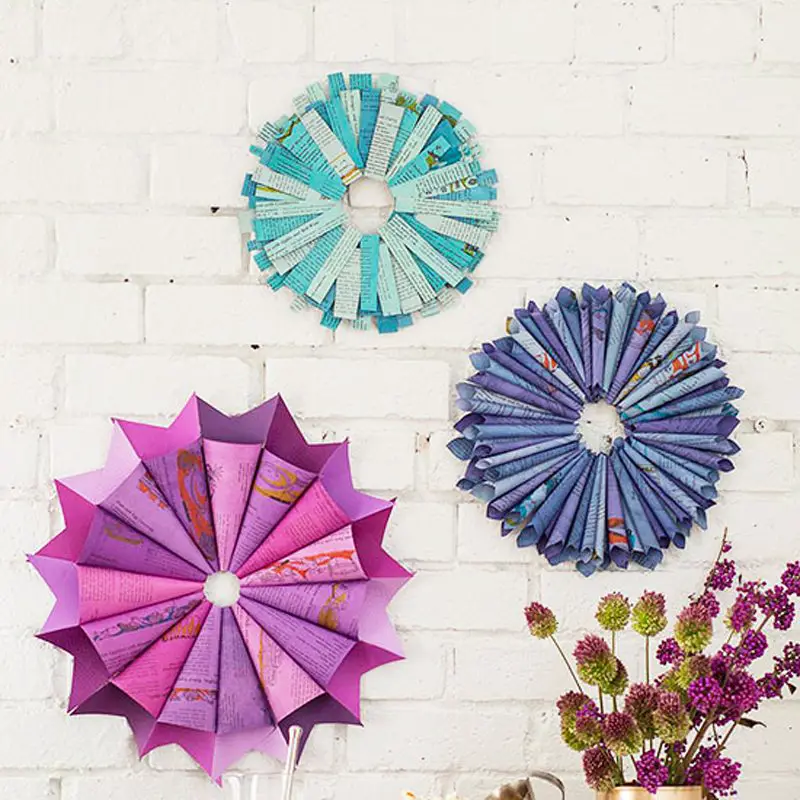
OK – this project takes some time to finish, but it only makes this activity a good way to spend time with your kids! Decorate their rooms or the patio together with this paper art project :) Read below for an example, and let your imaginations work to create unique designs!
Materials:
- Newspaper
- Crafts knife
- Old book pages (for best results, use thick paper)
- Powdered Rit dye in desired colors (see color combinations below)
- 2 glass jars
- 2 shallow pans
- Hot water
- Ironing cloths
- Iron
- Cardboard
- Glue gun
- Hot-glue sticks
- Adhesive dots or foam spacers
- Adhesive hanger or ribbon
Steps:
Colouring the book pages
Formula = TEAL
Light Shade: 4 tsp. teal powdered Rit dye + 2 cups hot water
Dark Shade: 2 tsp. teal powdered Rit dye + 2 tsp. denim powdered Rit dye + 2 cups hot water
- Cover your work area with newspaper.
- Using the crafts knife take out the pages of the book.
- Then prepare the two colour mixtures mentioned above in glass jars.
- Put these mixtures into shallow pans. You can add 2-3 cups of water if you want a little deeper “pool.”
- Completely submerge book pages, a few ones at a time. Soak the pages at different durations to achieve different shades. Remove from mixture when you get your desired shade.
- Rinse the dyed pages using cool water. Put them on paper towels and pat to remove excess liquid. Hang or lay pages out to dry.
- Smoothen these pages after by putting them in between cloths and ironing them.
Paper Decor
- Make the circular forms of your project by cutting a 9-inch diameter circles with a 3-inch holes in the middle.
- Cut the book pages at different sizes of strips.
- Starting on the outer edge of one of the cardboard forms, unevenly hot-glue random strips with 1–2 inches of overhang around edge. Continue around the outside of the wreath, leaving space between strips.
- Stick adhesive dots on top of the cardboard with paper strips. Place second wreath form on top and press to adhere. Stick random paper strips around second cardboard, this time placing them on the spaces between strips on the first cardboard. For the final layer, add paper strips to the wreath form using adhesive dots to lift, giving some dimension. Continue until cardboard is covered.
- You can hang it with an adhesive hanger or a loop of ribbon.
Source: Better Homes and Gardens